Tuesday, June 15, 2021

June block...Circle of Geese / Log Cabin....we're done!

 Here we are...the final installment of the Modern BOM!


Doing a BOM sure does seem to make the time fly...for me, anyway.


In this post I will share with you the following...


...our 12th block, Circle of Geese


...a 13th block. I'm kind of proud of this one as it's the first thing that I think I've ever designed, and it came out exactly how I envisioned it. I wanted to include a 13th block for those that may choose to put their blocks on point...a 13th block would make it do-able. For me, I used it to replace a block I wasn't too fussy on....so if you didn't like one of the blocks, or if one didn't quite work out to your satisfaction, you can use this as an alternate block. 


....also, very excited to share four different quilts made up of our blocks to help inspire you. Thank you to Karen Z, Stephanie S, and Jill J for working so hard to have your quilts ready to share with the class!


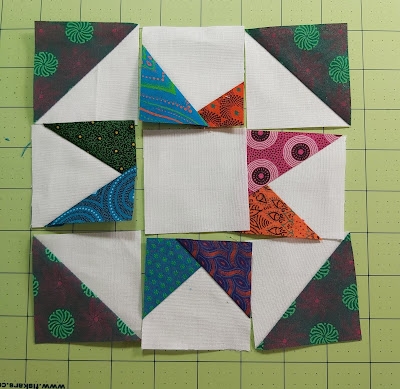
First let's start with the block for June (aren't we glad now that we doubled up on some months!, lol), which is called Circle of Geese. 

This is another paper-pieced block. It would be wonderful if it was constructed with a rainbow of colour...especially appropriate during June, Pride month. I did not do a rainbow of colour, only because I didn't have the appropriate fabrics in my shweshwe stash.


Make sure to check the size of the image that you print....mine came out kind of on the small size so I added a bit of extra space on the outside edge...you can see my pencil marks...


I took the time to cut out all my "geese" and audition how I wanted them to appear in the block, then I stacked them up in order...


I'm the first one to admit, paper-piecing is not my friend!...but I do acknowledge that for blocks such as this, it's the only way to go. 


(In case you want to know how I corrected the above problem...I was going to just put the block in and slap an appliqued heart on top of the gap, which I have done in the past! Applique sure comes in handy....like a band-aid. Then I had this idea...when I sewed on the inner border of the quilt, I just sewed it on over a bit to cover the gap after I made sure that it wouldn't effect any of the other blocks.)


For your 13th block, I imagined a modern take on the Log Cabin block, as it's one of my favourites. 


I don't have PDF directions for the log cabin block, because I don't know how to do that. 

If you want to make this block, just start off with a 2.5" centre square and add "logs" around it, just like a traditional log cabin block. 

The skinny logs are cut at 1.5", and the wider logs are cut 2.5". Do what I did and just cut each log as you need it...I think that would be easiest. 

There are a couple of logs that you have to actually piece before attaching to the block, such as the circles ones below. These pieces needed a 1.5" square of background fabric sewn to them first. 

If you want to use this block and have any questions, just give me a call or send me a message! I hope you like it....I do!!


Here is my quilt, all ready for quilting. I am soooo happy with it!


Mine is a bit traditional, I guess, for a modern quilt, but I did add a couple of modern touches.

For sashing I used a technique that I learned in a Zoom workshop, Speed Date With Improv by Krista Hennebury.

This was my original plan, but it turned out much better adding a white strip to either side of the pieced sashing...


Then I used a technique I learned a couple of years ago....a swift trick to make a very narrow inner binding...this one is 1/4" finished!


I had the idea of the narrow binding a few months ago, and I'm so happy with the result.

Now to some fun....Three of our members offered to make their quilts up ahead of time so we could share them here for inspiration.

First up is Stephanie Sinden's quilt...and it's quilted....and bound! She did a wonderful job on the quilting, didn't she??? This one measures 54"x76".


...and look at the beautiful backing that she dyed herself...


Next up is Jill Jackson's quilt, measuring 48x60...the fabrics are just glowing with the use of the black background...


Finally, we have Karen Zandstra's  version, measuring approx 60x84...very creative!...


And that's a wrap!! Thank you all for joining in, I hope you enjoyed our time together each month. 

Please remember to post your blocks, and your finished tops, on Instagram if you are able to, using the hashtags #tqgmodernbom #twilightquiltersguild.

If you are not on Instagram, but would like to share your version, please feel free to send me a picture via email, text, or Messenger, and I can post for you (this would be awesome!).

You can find this month's directions for the Circle of Geese block HERE on the Twilight Guild's blog post. 

Monday, May 10, 2021

Block 11 - Flying Geese

Hello there! 


I can't believe we are on Block 11 of our Modern BOM already!!


This month is an easy one, and I won't be going into much detail as I'm sure most, if not all, of you have had experience with flying geese.


 There are many ways to make flying geese. I basically followed the instructions included for this month, but feel free to construct them using your favourite method. Just make sure they measure up to the correct size so everything will go together smoothly to end with a nice 12.5" unfinished block.


I've decided that all of my geese will be different colours. I cut all of my pieces ahead of time...


When I am doing flying geese that use all different fabrics I like to use my Simple Folded Corners ruler...


I guess the one tip I would have is to press the seams carefully. They are on the bias so could stretch easily and result in wonky flying geese.


Arrange in a pleasing manner, then sew into the three sections...


And there we are...block 11!


Now we only have June's block to sew. I will be including a 13th block in June for those of you who'd like to make a quilt with the blocks set on point. It's a block that I have drafted myself....my first original block!


Also in June, I'm excited that we will have a few quilt tops ready to show you which will give you some ideas on fun, original ways to put these blocks together to make a quilt top!


You can find the link to this month's pattern HERE  at the Twilight Guild's blog post. 


Enjoy!....and remember to post your blocks on Instagram using the hashtag #tqgmodernbom so we can all enjoy your block!

Monday, April 12, 2021

Modern BOM....Block 10, Film Strip

Wow, we really are moving right along with these blocks! 


I guess it feels like that since we doubled up the last two months. We are on Block 10, and there will only be one block per month now, for May and June.


I really enjoyed this month's block. 


First things first, cut out all the pieces you'll need. A heads-up...for the Half-Square Triangles, I think you could use smaller pieces, I had more waste than usual making these using 3.5" squares.


I didn't cut the so-called "scraps" of focal fabrics at this point.


Make your HST's and the 12 "other" blocks (I don't know what else to call them, lol).


For the centre star block, if you don't care for the star, you can actually substitute a block of your choice, as long as it is 6.5" unfinished.


When you cut the scraps for the star points I suggest scraps that are 1.5" - 1.75"wide. Perhaps make one of the units first to get the hang of it.


For the centre of the star block you can do one of three things...

1. use background fabric like in the instructions

2. use a print fabric

3. fussy cut a fabric....always fun!


I took a couple of pictures to show the difference...


....I fully intended on using background fabric for mine, but I really liked seeing the print in the middle. A tip...I took all three pictures, then looked at them on my phone so I could see what I liked best. Doing this did help me decide!


Lay out all of your components and shuffle them around until you are pleased with the arrangement. I did make a mistake in this layout so as to make a point. Nowhere in the block should any of the focus fabrics touch the outside edge of the block. Note the upper left corner where I've got the corner unit placed incorrectly.


In this picture you can see it corrected...


Next, sew the units to the left and right of the star block together, then the upper and lower units...


Then sew the final seams to complete your block!


Now, I could have switched out the really short star point with a longer one (that was the first point that I sewed), but I'm ok with the quirkiness of it.

I'm going to put a bug in your ear to maybe start thinking of how you want your quilt put together in the end. There are so many possibilities.

I arranged my blocks on the design wall in no particular order...


Then I arranged them on point...


Remember, if you choose to do your blocks on point you will need a thirteenth block.  I kind of have an idea of a block in my mind to offer you, but I'll have to test it out first. 

Remember...share your work on Instagram using the hashtags #tqgmodernbom, and #twilightquiltersguild.

You can find the link to the Twilight Quilters' Guild blog post for our April block, in which you will find the link to the instructions for this block...HERE


Have fun!!


Monday, March 22, 2021

Modern BOM - Block 2 - Bordered Star

Happy Spring! What beautiful weather we've been experiencing. I hope to finish my work early today and get out to soak up some of this sunshine!


Our second block this month is called Bordered Star and I quite enjoyed it. There are a few segments to complete, but by just concentrating on one at a time you'll find it all comes together nicely in the end.


First, of course, is to cut all the pieces you'll need. I suggest you make a note on your pattern as to which fabrics are your Colour #1 - #5. This will help greatly in keeping everything organized. 


The first step is easy enough...actually none of the steps are difficult, it's just a matter of doing each step carefully. 


Here you can see I've sewn the 2 large squares together and sliced them on the diagonal...


I will be using two rulers that I find useful...keeping in mind that neither of them are necessary, you can easily complete the pattern with the technique you are familiar with. 

The first ruler I am using is the Bloc Loc, which I sometimes use for squaring up HST's. There is a slight "ledge" under the ruler that sits nicely on your seam. The trick to this ruler is to remember that the "letters" on the ruler, sit on the "lower" fabric (both start with the letter L)...


The next step is to snowball the corners...sewing on the dotted line that I have shown...


This is actually where I am using the second featured ruler, The Simple Folded Corner ruler. I quite like this ruler and use it whenever I can because it gives good results. Again, not necessary, of course, to use this ruler.


Next up is making flying geese. Again, this is where I sometimes will use my Simple Folded Corners ruler...and again, not necessary, but it does give good results. Make 4 flying geese using your background fabric and Colour #1


Then we make 4 more flying geese...being very careful about paying attention to your colour positioning.


This is the point that I will give you a little tip to have success at blocks with many different elements. Take the time to make sure each step results in an accurate size. For example, your flying geese should measure 2.5" x 4.5", unfinished.


Here I show all the segments of my block, ready to be sewn together...including 4 HST's...


Lay your units out carefully according to the picture in the instructions. 


Sew your flying geese units together, being careful of placement, as well as the centre HST's. For this I pressed my seams open to reduce bulk, especially since I am using Shweshwe fabrics, which are thicker than your normal quilting cottons. What you have now is basically a 9-patch to sew together.


And there you have it, a beautiful Bordered Star block! I really do like this block.


I did check with Lana at Quilt Junction...she does carry both rulers that I mentioned, although at the moment she only has a smaller sized Bloc Loc than what is needed for this block. I have no affiliation with the rulers, just passing on techniques that I find helpful. 


Please remember to post your blocks on Instagram if you can, using the hashtags #tqgmodernbom and #twilightquiltersguild. It's also nice to see a group picture of your blocks that we've done so far. 


From here on out we will go back to releasing one block per month. 

You can find the link to the instructions HERE at the blog post for the Twilight Quilters' Guild.

June block...Circle of Geese / Log Cabin....we're done!

  Here we are...the final installment of the Modern BOM! Doing a BOM sure does seem to make the time fly...for me, anyway. In this post I wi...