Monday, February 8, 2021

February Modern BOM - Block 1 - Raw Edges

 First off, I have to say....this is my favourite block so far!


I hope you like it as much as I do.


At first glance I thought this block was hand-appliqued...and I worried some of you may balk at this. Then I realized it was done by machine, and I balked a bit!! I've not done much applique by machine.


Oh well, all in the name of taking one for the team, right?


So I began.


First thing is to cut 25 assorted squares @ 2" and sew them together to form a checkerboard block...


You will need to make templates for the 2 sizes of circles needed for the block. You can do them in paper and use pins to attach to your fabric ....or do like I did and use freezer paper which you can press to your fabric with a dry iron. This is what I do in all of my hand-applique. 


Another idea....you can search around your kitchen for appropriately sized items to draw your circles....bowls, plates, etc. They don't even have to be exactly the right size...close is good enough!


On my copy of the pattern, the large circle was a bit cut off on the sides. No problem...I traced what I could, then rotated my freezer paper to trace the rest of the circle.


You will use the ring as a template for your 8.5" circle of focal fabric. You can see that I folded my circle of focal fabric into quarters and gave it a LIGHT press, and I also did this with my background fabric. Doing this makes it quite easy to make sure the blue circle is centred just right on the background fabric.


For my blue fabric I actually used the other side of a piece of Shweshwe fabric so that it would be a nice match for my block. Please don't let this confuse you...you will pin the large circle on to your background fabric RIGHT SIDE UP.


Now the fun part...machine stitch your circle on to the background using any stitch you'd like....even a regular straight stitch if you like. I chose to use one of the fancier stitches that I never get to use, just to be adventurous.

A caution here...remember to have the proper presser foot on your machine! You need to use an open foot to accommodate the wider stitches. (Unless you have chosen to do a straight stitch, of course)


If using a decorative stitch make sure your bobbin has lots of thread on it as these stitches use much more thread than your average stitch and it would be a pain to run out of bobbin while stitching the circle.

Now the scary part...flip your block over and cut away the background fabric from the inside of the circle, taking care not to cut through your appliqued circle. If you do, don't worry, you aren't the first!!! (Yes, this has happened to me before!).


Now use your 7" circle template to cut a circle out of your pieced block...


...I used the fold lines on my template to help me centre the template onto the 25-patch.

Place the circle on to the block...


When I first tossed the pieced circle on to the block, it just happened to be positioned en pointe...


.....which I actually liked better. One of those happy accident moments. Play around with yours and see what you like best.


Once you have it placed to your liking, pin it down and applique it in place. You can use the same decorative stitching as before, or a different one...up to you. You can see here that I had my trusty stiletto in use. This helped me to make sure the seams of the pieced circle stayed flat and behaved themselves. I have to say, once you get used to using a stiletto you are never without it. I did not take it with me on a retreat once and I couldn't get over how much I was reaching for it. I wasn't aware of how much I actually use my stiletto without even realizing it. 


Once the stitching is done, flip your block over and remove the excess fabric from behind...which is my blue fabric.

  A side note...you can think ahead to how this will be quilted. If it's to be quilted by hand, then it is preferable to do the cutting of the excess layers. If it will be quilted by a longarm, the added layers won't be a problem if you choose to leave them. I really can't comment on how it would work on a domestic machine.


All that's left to do is take your threads to the back and bury them and your block is complete!


I hope you liked making this block as much as I did. 


So, this quilt pattern has 12 blocks but we are going to be working on them in only 10 months. You will be getting a second block this month...I'd say two weeks from now on February 22nd.  I figured it would be best to squeeze it in now as most of us are currently stuck at home.

You can find the instructions HERE


Remember to post your block on Instagram with the hashtag #tqgmodernbom so we can all see your lovely work. Maybe even include a second picture of all of your blocks together so we can see how it's going?


Have fun....and remember, if you have questions you can always contact me at sandra.croley@gmail.com.

Saturday, January 9, 2021

January block.....Pixels!

 So, this month there is good news and bad news.


Good news....This is a pretty cool block!

Bad news....probably the most labour-intensive of the bunch...not difficult at all, just a bit time-consuming. But it's worth it.


The key word this month is "organization"!! ...and I'm here to help you with that. Of course, go about the block however seems easiest to you...I'm just sharing what worked for me.


As I worked on my block, I reminded myself of the old adage...how do you eat an elephant?...one bite at a time! So just settle in, do each step carefully, and before you know it you'll have a beautiful block!


First pick out your fabrics...you will need 6 feature fabrics and one background.

And, yes, I know my directions are printed in black and white...it seems that I need to buy a new colour cartridge for my printer!

You'll see though, to keep my fabrics organized, I marked the colours of the fabrics onto my directions. 


Then do the cutting. You can see in this picture how I kept mine in order so I wouldn't mix things up.


Because of all the pieces involved, and the size of them, it's important to do precision piecing, with a scant 1/4" seam. You know your own expertise...if you have doubts about your precision abilities, please see the following special note.


Special note:

 If you are nervous about the size of the pieces and the amount of seams in this block, here is an idea for you.


For the background pieces for Blocks A & B, cut the pieces a bit wider. 


For instance Block A, the pieces that are cut 1 1/8" x 2.5, cut them maybe 1 1/4" x 2.5" instead. Do the same for the other background pieces for Block A...and for the background pieces for Block B. 


 This will result in a slightly larger Block A (&B), which you can then trim down to a precise 2.5" block.


Gather together all the pieces you'll need for Block A...


Sew them together as per instructions, and repeat for Block B.


I then organized my blocks like this...


Now the fun part! 

Following the diagram at the lower left of your instruction sheet, lay out your blocks. You'll note that the instructions advise you to rotate some of the blocks so that you never have to worry about seams creating bulk. You can see this in the circled bits in the picture...this was before I rotated a few of the blocks to make them play nicely together. 


I sewed the blocks into together and was happy with the result!


I'm not going to lie...this block took more time to construct than the previous ones....but it was not difficult. 


Please remember to share your completed block on Instagram using #tqgmodernBOM so we can all look at your block.

You can find the instructions....HERE


Please note...the link may  not be active until after Monday evening. 

Have fun, everyone...can't wait to see your blocks!


Sunday, December 13, 2020

December block - Diamonds

 Welcome back to our modern BOM!


Hopefully you can take a bit of time to get this sewn up before you get too busy for the holidays.


Here is our block for December...


This block gives a nice opportunity to fussy-cut a piece of fabric for the centre of the block. I almost succeeded in my attempt!

This month we are paper-piecing again....I think it may be the last time for this programme.

Here's a few tips in how I constructed my block...


For the centre section, "A", I cut a square 4 3/4" (my orange fabric). For the background I used 2 squares cut at 5.5", then cut them on the diagonal to give you the 4 triangles needed. 


For the half-square triangles, I did as the instructions read...but you can do them in your preferred method, as long as they end up at 3.5" unfinished. 

What I did do differently...I pressed 2 of the HSTs to my purple colour, and pressed the other 2 to the background fabric. By doing this it helped when sewing them to each other to form the Flying Geese segments.


...I chose to press seam of the Flying Geese open to help it lie flatter.


Now on to Segments B, C, D, & E

I chose to mark my colour choices on my pattern pieces to help keep me straight...


Segments B  & C


(For my white background for these segments, and for Segments D & E...I cut a 3" width-of-fabric strip. It did all four segments with more than 12" left. )


On your instruction sheet, the pieces that are yellow...I cut a 5.5" square and cut it in half diagonally for the 2 segments. This was enough with just a little wiggle room. If you are not a confident paper-piecer, maybe go a bit larger to give yourself a bit of a safety net.

The pieces that are orange on the instruction sheet...I cut a 4 1/4" square and cut it diagonally to get the 2 pieces needed. Again, cut this a bit bigger if it makes you more comfortable. 


Segments D & E


Same as above except with the following measurements...

The orange in the instructions, maybe 5" cut in half diagonally ( I say maybe because in mine I had cut some rectangles that created too much waste. That's when I figured that triangles would have worked more efficiently.)

For the yellow bits...cut a 3.5" square and cut it on the diagonal to get 2 triangles.


Normally with a paper-pieced block you would leave the paper intact until the whole block is constructed. The sections in this particular block are so big and simply-pieced that I decided to remove the paper before putting all the segments together. 


(At this point, I chose to take one of the two pieces on the left, either Segment B or C, and I reversed the pressing on one of the seams that fall between my background and blue fabric. This made the seams nestle nicely when sewing B & C together.)

Now sew together like so (and I chose to press these seams open)...


Then sew the final two seams, which I also pressed open as I thought it made the spots where my blue fabrics meet much nicer...well, 3 out of 4 of them, anyways!


And here are our first four, playing nicely on the design wall...


(What a dull, dreary picture!...that's the best I can do on this dull, dreary day.)

You can find the PDF for this month's block HERE .

I hope you have fun with this block. If there are any questions, please ask me or one of your quilty friends for some help.

And remember to post a picture of your block on Instagram with the hashtag #tqgmodernbom so we can all see your beautiful blocks. Maybe this month try to post a picture of your block, and a picture of all four blocks we've done so far.


Monday, November 9, 2020

Block 2 of our Modern BOM - Chevrons

 As I sit here writing this, I can't believe the weather we are having for mid-November...it feels like the beginning of September, actually!


This month's block is called Chevrons, and here's what it looks like...


The block is 12.5" unfinished...like the others we've done so far. 

We will be constructing this block using foundation paper-piecing. 

I have to admit...I've never enjoyed FPP, but I do know that's the only way to get spectacular results with blocks like Mariner's Compass, etc. 

The units in this block are fairly simple, and I would say to go ahead and use whatever method of FPP suits you. Last year I learned a "new-to-me" method which made it so much easier for my brain. 

First thing....

For the fabrics that you need, the ones listed are fairly generous, which is fine. If you are a bit more experienced, you can cut the fabric pieces at 2.5"x6" instead of the listed 3"x6" to result in less waste. 

For the background fabrics, I was able to get by by cutting 3 strips, 2.5"x20" for the chevron units instead of the 12 3"x6". 

The postcard/cardboard...not necessary, unless using some is your preferred method.

You will need to print off 3 copies of page 2 of the instructions...


Please make sure that you have printed them at the correct size. As you see in the above picture, the unit should measure 3.5x4.5. Our instructions say to cut these units out on the outside lines...BUT, I prefer to cut around the units leaving a rough quarter to half inch all around each unit...


Paper-piece these units, using your preferred method. I have made one change, though, to make things a bit easier for block construction.

For your B units, change the order of the #'s....Instead of 1 at the top, and 3 at the bottom, pencil in the #3 at the top, and #1 at the bottom...


By reversing the order on the Unit B's, when we sew the 2 units together later the seams will nest together nicely resulting in less bulk.

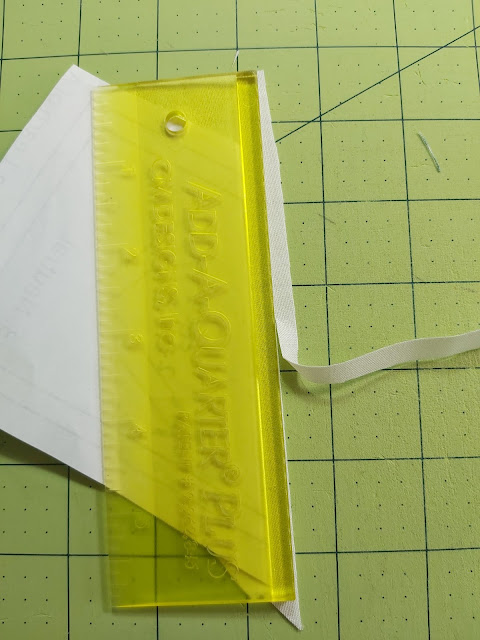
A tool that I have found handy for paper-piecing is the Add-a-Quarter ruler...


There is a little 1/4" ledge that sits on the edge of paper that helps cut a nice 1/4" seam allowance. Of course, you can do this with any of your rulers, but sometimes they will slip when you're holding them on paper, as opposed to the usual fabric that you usually use them on. This one stays nicely in place. 

Sew all of your A and B units...


Now...flip the units over and cut away the excess, taking care to do this on the cutting lines, not the inner line which is the sewing line!


Sew your A and B units together. For mine, I pressed this seam open to reduce bulk.


Normally when paper-piecing you would wait until the block is complete before removing all the paper. For this block I found that since the units are fairly simple and not intricate, it was ok to remove the paper at this point. 

Repeat this AB unit twice more, to get the 3 chevrons that you need for the block.

Sew them together. Sew your background strips on either side, and you are done. Easy-Peasy!


(you can see in the above picture that on the left side of the block the seams are pressed upward, and on the right side of the block they are pressed downward to make construction easier, as advised earlier)


You can find the PDF for the Chevron pattern...HERE.


Also, there is a bonus this month! 


For the month of November, Quilt Junction in Waterford is offering 10% off the purchase of your very own Add-A-Quarter ruler! Just go visit Lana at Quilt Junction and take your first 2 blocks along to show her that you are taking part in the Modern BOM. 

Sunday, October 18, 2020

Block 2 of our Modern BOM, "Woven"

Hi there everyone....time to work on the second block of our Modern Block of the Month. 

The name of this block is Woven, and by the look of the block you can see that the name is appropriate. 


It's quite an interesting looking block and looks pretty straight forward...until you really look and wonder how on earth this block would be constructed!

Some of you will know of a thing called "sewing partial seams". That is the secret behind this block. For those of you who have no idea what that means...you'll soon find out!....and have something new to add to your quilty tool box.


First, cut out all the fabrics needed for the block, as per instructions.

This is a picture of my background pieces...


When there are just one of many different sized pieces, I do have a couple of tips to help keep them organised. One is to just lay them out in the order that they are listed in the pattern, which I have done. 

I've gone a step further and marked each piece with it's designation...A1, B2, etc. I'm careful to mark this on the edge of the piece in what will become the seam allowance. I'm using my new favourite marking tool...a water-erasable marker. Another good tool is a mechanical pencil...which you would for sure just mark in the seam allowance!

Here are all of the pieces for the block laid out, with sections A, B, C, and D sewn together (which is just straight-forward sewing)(also, I have marked the sections with the marker for the purpose of instruction, I wouldn't normally do this) ...


....and there is piece E in the middle. We start the next step using piece E and section A.

Sew piece E to section A, but take care to only sew from where I've marked mine with an arrow, to the end of the seam. Note, you will NOT sew that first bit at this time....that unsewn bit is approximately a third down from the edge of piece E...


Here's how it will look....your partial seam!...(I usually do a little backstitch at the beginning of the partial seam)...


I did press my seam to the blue fabric, but only the bottom half of the seam for now...


The next few steps are quite easy...just regular sewing. First, sew section A to section C...


Next, attach section D...


....and then section B...


...after that, you can see that we only have that partial seam to close up.


....just sew the seam from the edge of the block up to that original partial seam that we started with....shown by that blue arrow on mine.

Et voila!....our Woven block...pretty impressive!!!


I hope some of you learned something new this month. If the instructions are confusing in any way and you have questions, please don't hesitate to contact me at sandra.croley@gmail.com...or through Facebook messenger, if you prefer. 


You can find the PDF HERE


If you are able, please post a picture of your block on Instagram using the hashtag #tqgmodernbom so we can all enjoy each other's blocks.

That's it for this month. Take care, and stay safe.


Wednesday, September 16, 2020

Fabric choices????

I just thought I'd touch base as we begin this Block of the Month and talk about fabric choices.


If you're confused now, I hope I don't leave you even more confused after this post!


Being a "modern" quilt, the first thing that comes to mind may be to use solid colours with perhaps a white, grey, or black background. Good idea!!! And if you have never made a quilt from solid fabrics, now could be a good time to try. A bonus, there are no right or wrong sides of the fabric. 


But wait!....this is your quilt and you get to make the choice of fabrics! 

There really are no "quilt police"... lol...I actually heard a speaker say that at the beginning of her trunk show once, then she proceeded to tell us all the faux pas' in quilting....I guess maybe she was the quilt police! 


If you are fairly new at quilting and find fabric choices daunting...and even if you are an old pro and still find it difficult, here is an old trick:  Pick out a focus fabric...this could be something to be used as a border of your quilt, or a fabric that may make an appearance in each block...or perhaps it could be the sashing. Now, pick the rest of your fabrics drawing from colours in the focus fabric.


Another idea is to look at quilts you've made in the past and really notice what your desired "look" is and go with it. Or maybe to think outside the box, look at quilts you've admired of your fellow quilters and try to follow their lead for something "new to you". 


Another idea is to go through your quilting magazines, or Pinterest, and see what excites you. This is a small project, one that shouldn't be costing you too much money, so maybe it's the perfect time to try something new.

One caveat....I tried "something new" a couple of years ago with a Bonnie Hunter mystery quilt and absolutely hated it, so I abandoned that one halfway through. I don't mean to scare you from making new choices, but it does happen.

Something fun to try is a 2-colour quilt....such as blue and white, for example. This is challenging and not for the faint of heart, in my opinion. If you try it (and it would be wonderful to see someone try), pay particular attention to contrast. One way of doing this is to take a picture of your fabrics and edit the picture to be just black and white...you'll see if there is enough contrast, or not.

An easy choice is if you happen to be purchasing fabric for your quilt. Staying in a particular fabric line does make things a little easier and harmonious.

If you "shop your stash" you can take comfort in the fact that you will most likely like your quilt...considering the fact that fabric that is in your stash is probably something that you like since you bought it in the first place! (that feels like an awkward sentence, but hopefully you get my meaning)

For my quilts...I'm not one to like to have the same fabric, but in different colours. I prefer to have all my fabrics different. For instance, if I included a blue Spotty Grunge fabric for my quilt it would bother me to have a red Spotty Grunge in there, also. That's just something I know about me. 

I like to have different "textures".....maybe a stripe here, a polka dot there...a floral thrown in...and a tiny print, etc. 

I'd say, in the end, for this quilt...watch your contrast, that would be my main point to get across to you. I hope I've given you a couple of helpful pointers. There are so many "correct" choices at your disposal....and not many wrong ones.

Please reach out to me or your quilty friends for advice if you are truly hung up on fabric choice. Remember, this should not be agonizing...it is our hobby, it's supposed to be fun!


And remember...we'd love to see your progress on Instagram using the hashtag #tqgmodernbom.

Monday, September 14, 2020

Block 1 of our Modern Block of the Month

 Hello everyone!

 I hope you are all well and keeping busy with things that make you happy, including sewing.

For Block 1 of our Modern BOM we will use four fabrics...3 fabrics plus 1 background fabric. 

The fabrics I chose happen to be colour coordinated with the block's instructions. If yours are not, I suggest numbering them 1, 2, 3, and 4, and make notes on the instructions which are which. This will hopefully help avoid confusion.

As it says in the instructions, you will cut out 4" x 8" rectangles...2 from each fabric. This is if you want to use the method in the instructions for constructing half-square triangles (HST's). You can use your own preferred method if you want, I think we all have our favourite. I decided to do what the pattern instructs us to.  I always like to try "new-to-me" methods because you never know....it may become my new favourite method!


Next, draw the lines on the fabric as shown in the diagram, and in my picture. These are NOT sewing lines, they will come to be cutting lines shortly. 


You then sew on either side of the diagonal lines. You can chain sew these to save a bit of time.


Once the sewing is done, you can now cut the drawn lines


Take note on the next step....the pressing of the units. For each colour combo (there will be four of each combo), you will press the seams of two HST's to one side, and the opposite way for the other 2. This is important for when we sew it all together...the seams will nest nicely for easier sewing and to reduce bulk.

In my picture you can see that two are pressed to the orange, the other 2 to the white background fabric.


You will then trim the blocks to 3.5". I know it's a bit tedious to make the blocks bigger than you need and then trim them down, but this results in precision...a much desired thing in piecing quilts!

On a side note, for trimming HST's I really like using the Bloc Loc rulers. They definitely are not a necessity, but it is a ruler that I'm glad I purchased (lol, not like a drawer full of ones that I don't use). 


Next, follow the diagram in the instructions to assemble your block. 

Take particular notice of the arrows on the diagram. These arrows indicate which units to place where, according to which way you pressed the seam allowances (clear as mud?). 

Sew the units together into four horizontal rows. Press the seams in rows 1 and 3 in one direction, and press the seams in rows 2 and 4 in the opposite direction.

Then sew the three long seams. I happened to press these seams open, which was a personal preference for this block. As someone who has been making quilts for 40 years now, I can't believe that I now press seams open on occasion! I think, for this block, it makes it lie flatter once it's all pressed. 


And there you have it...the first block done!


Remember, we'd all love to see your blocks! Please post pictures of them on Instagram using the hashtag #tqgmodernbom. If you are new to Instagram, note the use of all lower-case letters, and no spaces.

If you don't have an Instagram account, I suggest you consider it. It is such a good tool for sharing ideas with people, near and far. I prefer it over Facebook, actually. Maybe you have a friend that could tell you all about it and explain how to make the most of it. 

For example....if I am making a Log Cabin quilt, I "follow" the hashtag #logcabinquilts, then anytime anyone in the world uses that hashtag I will see that post. Great for getting ideas on design and colour. I actually have many "virtual friends" now that have the same interest as I do. 

Also, you can follow your friends on Instagram to see what they want to share. When looking for someone you know, you use this symbol "@"....for instance, to find me you would type in my handle, which is @sandra.croley. 

June block...Circle of Geese / Log Cabin....we're done!

  Here we are...the final installment of the Modern BOM! Doing a BOM sure does seem to make the time fly...for me, anyway. In this post I wi...